E1 | NOLA Lantern, Rusty Patio Set | Ask This Old House
Season 24 Episode 1 | 23m 42sVideo has Closed Captions
NOLA copper lantern fixtures; why toilets overflow; restoring rusty outdoor furniture.
Heath Eastman visits New Orleans to see how a lighting manufacturer handcrafts copper gas and electric lanterns, he then helps install one of their electric fixtures at a traditional NOLA shotgun house; Richard Trethewey breaks down why toilets overflow when they clog; Mauro Henrique helps a homeowner restore her rusted metal patio furniture set with a little sanding, primer, and paint.
Problems playing video? | Closed Captioning Feedback
Problems playing video? | Closed Captioning Feedback
Funding for Ask THIS OLD HOUSE is provided by The Home Depot and Renewal By Andersen.
Support provided by:

E1 | NOLA Lantern, Rusty Patio Set | Ask This Old House
Season 24 Episode 1 | 23m 42sVideo has Closed Captions
Heath Eastman visits New Orleans to see how a lighting manufacturer handcrafts copper gas and electric lanterns, he then helps install one of their electric fixtures at a traditional NOLA shotgun house; Richard Trethewey breaks down why toilets overflow when they clog; Mauro Henrique helps a homeowner restore her rusted metal patio furniture set with a little sanding, primer, and paint.
Problems playing video? | Closed Captioning Feedback
How to Watch Ask This Old House
Ask This Old House is available to stream on pbs.org and the free PBS App, available on iPhone, Apple TV, Android TV, Android smartphones, Amazon Fire TV, Amazon Fire Tablet, Roku, Samsung Smart TV, and Vizio.
Keep Exploring

This Old House Insider Newsletter
Get This Old House exclusive stories, tips, and behind-the-scenes information delivered right to your inbox every month.♪♪ Kevin: On "Ask This Old House," our experts travel across the country to answer questions about your house.
♪♪ Today, Heath heads to New Orleans to install locally made lanterns.
Heath: That looks beautiful.
Kevin: Then, do you know how to stop an overflowing toilet?
Richard gives a few tips on how to solve this problem.
And Mauro shows how a fresh coat of paint can give new life to a rusty patio set.
Maureen: This looks fantastic.
Kevin: On "Ask This Old House."
Heath: I'm on my way to New Orleans, Louisiana, the Big Easy.
New Orleans is well known for a lot of things -- Mardi Gras, jazz music, and a rich architectural history with housing styles like the Creole cottage, the shotgun, and the Greek Revival, just to name a few.
But for me, what really excites me about New Orleans are the light fixtures.
The streets are lined with beautiful lanterns, both gas and electric, that date back 100 years.
So today, I'm helping a homeowner replace her light fixtures with ones that are more suited to the style of the city.
But first, I want to meet the local artisan who's going to show us just how those fixtures are made.
Hi, Stephen.
Stephen: Hi, Heath.
Heath: Nice to meet you.
Stephen: Same here, buddy.
Welcome to New Orleans.
Heath: Thank you.
I love coming to showrooms like this and seeing everything that you have on display.
So can you tell me a little bit about what you do here?
Stephen: Oh for sure.
So, we handcraft gas and electric lanterns.
We make everything from scratch here and send them all across the United States.
Heath: These things are beautiful.
Do I understand correctly?
You're kind of known for making one particular fixture that's pretty famous.
Is it New Orleans style?
Stephen: Yeah.
So, the New Orleans style, we actually call ours the Bourbon Street fixture.
But you'll see it all through the greater New Orleans area and especially in the French Quarter.
Heath: I'm pretty sure I have, some different sizes, some larger ones and smaller ones, but same idea.
Stephen: For sure.
Heath: What makes it New Orleans style?
Stephen: So, you know, gas lights have been in New Orleans since the 1800s, and with the Spanish and French heritage, this definitely fits all the architectural styles you'll see downtown.
Heath: That you would have seen, that kind of shape.
And it looks like you make a little bit of everything, not just those.
Stephen: Correct.
So, although we do a vast business in New Orleans, we ship lanterns all over the country, and we need styles to fit that architecture, as well.
Heath: Got it.
And I understand you're making a couple of light fixtures for our homeowner.
Stephen: Yes, sir.
Heath: And they're not this style.
They're something a little bit different?
Stephen: Nah, something really cool, though.
You want to take a look?
Heath: I do want to take a look.
Stephen: Okay.
Heath: Thanks.
Stephen: Alright.
So, everything comes into our factory as a sheet of copper.
Heath: So everything comes in like a raw sheet like this.
Stephen: Oh, yeah.
Every week, we get tons of copper delivered just like this.
Heath: And this is pretty thick.
Do you have different thicknesses you usually work with?
Stephen: We use 16 ounce, 20 ounce, and even some thicker grades.
Heath: Depending on the fixture, how big it is, and what you're building?
Stephen: Absolutely.
Heath: Alright.
Stephen: And Dennis right now, he's on the foot shear.
We're going to break down some of the sheets into smaller pieces that we can handcraft and get these -- Heath: Okay, so he's just making all the parts smaller off of this sheet.
Stephen: Yes, sir.
Now Dennis is on the notcher, which cuts cut small angles into the side of the copper, and that allows us to bend and fold the metal.
Heath: So that notch you're using right now is actually making a 90-degree cut, right?
A nice, clean 90?
Stephen: Absolutely.
Heath: Nice.
Stephen: So right now, we have Dennis with the hand snips.
And that's to cut out some of the more decorative tops that we use.
Heath: So you still actually use a template and cut that by hand.
It's not all machined up.
Stephen: Oh, yes, yes, for sure.
So much of what we've done is really using hand snips for the fine details.
Heath: And it looks like you've got rows of parts waiting for other lights, as well?
Stephen: Oh, yeah.
After the parts guy's done, he keeps them on the shelf ready for fabrication.
Heath: Nice.
Stephen: And we've got Justin here, just about to put some rivets in one of those New Orleans style lights that you like so much.
Heath: Alright, that is the New Orleans style light.
A little bigger than what we saw on the showroom wall.
Stephen: Yes, sir.
Heath: And he really is riveting each one, huh?
Stephen: Oh, yeah.
We use rivets 'cause, you know, with gas lights especially, the heat will break down solder over time.
So we rivet everything to make sure it stays secure for a lifetime.
Heath: That's a great point.
I didn't think of that, 'cause most of what we see is soldered up by us.
Stephen: Yep.
Heath: So rivets, you don't have to worry about the gas lanterns.
What's the next step?
Stephen: Oh, that's oxidation.
Really cool.
Let's take you there.
Heath: And that's where we get the finish?
Stephen: Yes, sir.
Heath: I want to see that.
Stephen: So, Heath, we're over at the oxidation tank now, where Vince is going to submerge the fixture in the potash solution.
And what that's going to do is help give us a nice 10- to 15-year aged finish.
So he's going to dip it several times.
He's going to work it in with some steel wool.
And in a matter of a hour or two, you'll see that beautiful finish.
Heath: And that's all it takes, a couple hours, you can get that aging on it.
Stephen: Correct.
Heath: Alright.
So after we're done dipping this and getting it to the point we want, last step is the final assembly?
Stephen: Oh, yes.
Heath: Perfect.
Let's take a look Stephen: Okay.
So we're here at the finishing station.
And we have Steve putting in the electrical components.
Heath: So he's finishing up the socket now.
He's got the wires through, has the ground on the back.
Everything looks good.
But if the customer had wanted gas instead, it would still be done in this spot?
Stephen: Oh, absolutely.
Everything would happen at this station.
Heath: Okay.
And the last step would be the glass.
Stephen: Oh, yeah, glass will go over there.
And at that same time, we'll put in our signature hurricane globe.
Heath: Great.
Alright, Stephen, is that the final product?
Stephen: Yes, sir.
Here's your lantern.
Heath: Ah, I'll take it.
That looks beautiful.
Love the work you put into these.
I can't thank you enough for making this.
And the homeowner is gonna love it.
Stephen: Oh, man.
I'm glad to have you guys by.
Heath: I appreciate the tour of the shop.
Love seeing the process.
And we'll get this installed for them, and I'll talk to you soon.
Stephen: You're very welcome.
Good luck with your project.
Heath: Thank you.
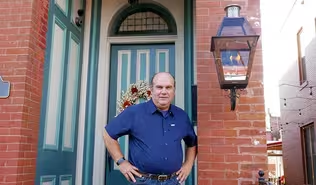
♪♪ Roxanne: Hi, Heath.
Welcome to New Orleans.
Heath: Hi, Roxanne.
Thank you.
Nice to meet you.
Roxanne: You, too.
Heath: This neighborhood is great.
I love these houses.
Roxanne: Thank you.
Heath: So, what style is this one?
Roxanne: This is a traditional New Orleans double shotgun.
About the turn of the 20th century.
Heath: Okay, so I've heard of the term shotgun, but double shotgun, it was split down the middle?
It was a two family originally?
Roxanne: That's correct.
Heath: And you've converted it to a single family?
Roxanne: Yes, we have.
Heath: Oh, that's great.
But I saw that you wrote in about changing some light fixtures.
Roxanne: Yes.
We've put a lot of work into the exterior to make it look better.
And the light fixtures at this point just don't go with it.
They're outdated.
They're not very attractive.
Heath: Makes sense.
Well, the good news is I saw the light fixtures that you chose being made, and they look amazing.
I really think you're gonna love them.
Now, the one thing is, I'm not licensed in the state, so I'm going to bring in a local electrician that's licensed and knows the local rules and regulations better than I do to kind of help us go through the whole process.
But in the meantime, I'd like to turn the power off and climb up and take one of these down and take a look and see what's going on behind there so we know what we're dealing with before we go ahead and install them.
Are you okay with that?
Roxanne: Absolutely.
Heath: Alright.
It's always interesting coming to places down south where we see the electrical panels outside.
Not used to that up north where we are too much.
Alright.
So we're going to take those off.
And let's see.
Just our fixture bar secured to the house with some wood screws, no junction box and just a wire sticking out.
Alright.
So let's take this one down and see what we have behind it.
Oh, look at that.
So this is one of the reasons you want to seal these fixtures up.
I don't know if you can see this, but all kinds of stuff stuffed in here.
Alright, Roxanne.
So we picked up the lights, and here's the finished product.
What do you think?
Roxanne: It's incredible.
Heath: I think they look great.
So we took the old ones down to see what we had going on behind there.
And we found kind of what we thought we'd see.
There's no junction box behind there, just a bare wire coming out of the wall.
And to be honest, you had a couple of little critters forming nests back there, so -- which is okay.
We've cleaned it up, and we can go forward.
So we want to put a junction box in.
And the easiest way to do that with your siding is to take something like this.
This vinyl block we can slide over there, this has the built in junction box the wire will come through.
But the nice part is we don't have to cut any of the siding.
It's designed to go right over the siding and over the lap so it fits over that tightly.
Screw this in, pull the wire through, and we have our junction box.
Nice and easy.
At the same time, we can then take some silicone and seal the top and bottom of this to get it sealed to the house so no water is getting in there, no critters anymore.
That way, that's done.
Waterproof.
We're good to go.
But you can see the fixture is kind of bigger than this.
And I want this to sit -- sit very well on the house.
So we're going to take this extension, slide it over that box.
We can see it lines up with the screw holes.
But then we have the white against this.
It doesn't look great when you have this beautiful new fixture.
So the shop was nice enough to make this.
Roxanne: Oh, beautiful.
Heath: Once that's over, fixture's on, it's gonna look perfect.
So now it's time for the fun part.
Ready to get to work?
Roxanne: I'm ready.
Heath: Alright.
A locally licensed electrician, Troy, is here to help.
♪♪ So we're just gonna take that connector and pop that right in the back.
So now the wire will come right through there.
♪♪ Oh, that's good.
Yeah, don't want to crush the vinyl.
Let's see how that looks.
Troy: That's us.
Heath: Pretty good?
So now we want to seal up all the way around that.
♪♪ Alright, Troy, you want to slide that over?
Get that lined up.
And next we have the metal plate to hide that vinyl block so it matches the fixture.
Drilled it for a bushing so when the wires pass through, they're not running against the sharp edge.
Alright.
So now we're actually ready to finally wire the fixture.
So we're going to go ahead and tie the ground wires together first.
We've gone ahead and put a bonding screw into this plate.
Since it's metal, we'll make sure it's mechanically bonded to the fixture and to the wire.
So, on the house, we have a black and a white.
Our black is the hot, the white is the neutral.
On the fixture, we have two blacks.
So how do we know which one goes to the black and which one goes to the white?
If you can see, the neutral is usually identified.
So you can see the ribbing on the outside of that jacket.
And on this one, it's smooth.
The ribbing, the identified one, will go to the white wire, the neutral, the smooth one to the black.
♪♪ ♪♪ And now we're just going to repeat the process that we just did for this second light.
♪♪ ♪♪ ♪♪ Alright, Roxanne.
So thanks to Troy's help, the lights are in.
What do you think?
Roxanne: I love them.
They could not be more perfect.
Heath: Troy, I can't thank you enough for the help getting these in.
These things look amazing.
They fit the house well.
It looks like they've always been there.
One last thing is, for the bulb, we chose a 2700 K color, soft white.
It's nice and warm, kind of mimics the incandescents, looks a little bit like the gas flame, a little closer to that color of the gas lanterns.
Roxanne: Yeah.
Thanks.
I think it looks great.
Thank you both so much for being here.
Troy, thank you for your help.
Heath, thanks for coming to New Orleans.
Heath: Thank you.
It was a great project.
I'm glad you called.
Roxanne: Thank you both so much.
Heath: Alright.
We'll see you later.
Troy: Have a good one.
♪♪ Kevin: Look at you, Richard.
Starting the new season strong.
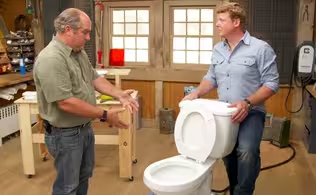
A toilet and a cutaway.
Richard: I'm so glad you noticed.
I thought we would talk about something that is a nightmare -- overflowing toilets.
It wrecks your day.
It wrecks the house.
It's terrible.
And I thought if we could get people a little more comfortable with what's going on inside the toilet, it might change behaviors.
Kevin: Okay.
Richard: So, you've got a tank, and you've got a bowl.
In the tank, there is two gallons of water.
Here's one gallon, here's the other.
So when you hit that tank lever, that water comes down here through this flush rim.
Here's represents the bowl.
And two things happen.
One is water comes here, and it creates a siphon.
It pushes water up here.
But also the weight of the water coming into this bowl also helps push it up through the trap way.
Kevin: This is like 16 pounds.
Richard: Correct.
Okay?
And so now you'll notice also that this trap way gets smaller.
Do you see how it gets smaller right here, okay?
So let's create a stoppage, okay?
This could be toilet paper.
This could be solid waste.
It could be a variety of things.
Kevin: The ease with which you just stick your hand -- Richard: It's just water, Kevin.
This is for educational reasons.
This is education.
Kevin: Unsettling.
Richard: So now, so we hit the toilet flush.
Okay?
Kevin: So the water is coming out of the tank into the bowl, but now it can't evacuate the bowl.
Richard: So now they come along, and it's filled up to here.
And what do they do?
They're gonna just hit that lever.
Kevin: That's when you know you have a teenager.
Richard: Right.
I know that teenage son, and this is what he would do.
He would go like that, and he'd say, "Oh, I can't believe this, Dad!"
Kevin: Stop it!
Richard: I'm sorry.
[ Laughs ] So the lesson is, if it's already filled, you just don't do -- You just don't go for a full flush, 'cause it's two more gallons, right?
Kevin: The worst feeling.
That is the worst feeling right there.
Richard: So you come along, and somebody still thinks they can do it again.
Kevin: No!
Richard: They hit the flush, right?
And now that water's gone down through the first floor, down to the basement, gone to -- It's gone down through floor upon floor, okay?
So now, now sometimes -- I want to let you know, though, sometimes when you add a little bit more water, it actually will indeed clear it.
Kevin: 'Cause this is heavy.
Richard: Right, it's heavy.
And so say -- You see this trap way.
So say there's too much toilet paper or something right here.
Sometimes it's just enough -- Kevin: And it always happens at least once to encourage you to do that.
Richard: To do that again, yeah.
Kevin: Exactly.
Richard: So then all of a sudden it might clear, and you say -- You're okay.
So, but there are other times when it gets down, gets impacted, you have no other choice but to try and mechanically clear it.
So, everybody knows a plunger.
Kevin: Yeah, yeah.
Richard: It's often misused.
What people do, they come like this, and they get sealed onto the opening right here at the trap way.
And they'll say, "I'm going to just push as hard as I can."
Kevin: Yeah.
Give it everything you got.
Richard: [ Grunts ] And so what happens is you actually can impact and make that tighter and harder.
So what you want to do is actually go just the opposite way.
Get a seal right here, get some suction on it, and pull the other way, hoping that you'll release it back up here and then thereby let it go down.
Kevin: So you're pulling it from the narrow to something wider.
Richard: That's right.
Kevin: Might do the trick.
Richard: That's right.
Kevin: Yeah.
Richard: Alright?
Kevin: Oh, boy.
Richard: So the other thing is, if it's just solid waste, you know, it often will be cleared with a plunger, or we have some other tools that can clear it, but sometimes you'll have a toilet -- We've had stories upon stories that we'll have a toilet that'll act fine for six months, and then it won't.
Kevin: It just gets clogged mysteriously, like a little ghost toilet.
Richard: Two stories.
Kevin: What?
What, what, what?
Richard: Cold cream container.
Kevin: Okay.
Richard: Gets flushed down the toilet.
The trap way gets smaller.
What does it do?
It gets stuck this way.
We come with the plunger, we clear it, and it goes like this, and it stays like this for six months.
Kevin: Water comes through.
No clogs.
Richard: Then it goes like this.
Kevin: Goes back.
Richard: So, too, with a woman's bracelet.
Kevin: Drives you crazy.
Richard: Here, and it goes here.
The only way you fix that?
Take the toilet out, smash it into a million pieces.
[ Both laugh ] Find the cold cream, and get them a new toilet.
Kevin: We're going to have to talk about your morning routine.
Cold cream?
Richard: Well, it wasn't me.
I didn't do it.
We only fix them.
Kevin: Alright.
So starting off the season with a nightmare.
Richard: Yeah.
Here, let me flush it for you.
Kevin: Don't do that.
Please.
♪♪ ♪♪ Mauro: Hi, Maureen.
Maureen: Hi, Mauro.
Nice to meet you.
Mauro: Nice to meet you.
So you have a project for me?
Maureen: I do.
We have some outdoor furniture that's in desperate need of your help.
Mauro: Alright, let's take a look at it.
Maureen: Alright.
Mauro: Wow, Maureen, look at this backyard.
Look at the grass.
So green.
Maureen: Yeah.
My husband really is the green thumb.
That's his domain.
But maybe you can help me with the table, and we can give some more life to this.
Mauro: Alright.
This is a very nice table.
Look at this, the design.
And you got the table.
You got the chairs.
Lots of rusty going around.
Maureen: Well, it is 15 years old, but they don't make them like they used to.
They're all boxy, and, you know, this intricate design, we really like.
So I'm hoping you can help us give it a new life.
Mauro: Absolutely.
We can help you out with that.
We're going to need to do some preparation and bring this table back alive again.
Any color in mind that you'd like to paint?
Maureen: We'd like it to match the fire pit furniture.
Mauro: Black?
Maureen: Black.
Mauro: Ready to go to work?
Maureen: Ready.
Mauro: Let's get some tools, and let's do it.
Maureen: Alright.
Mauro: Alright.
Alright.
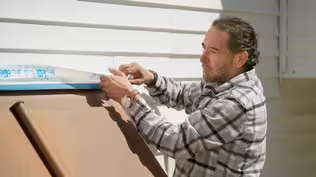
First thing that we're going to do, we're going to protect everything that we are not painting.
In this case, it's going to be the slats.
Okay?
So we're going to use this green tape.
We're going to protect everything, top, sides, and the bottoms.
A good paint job comes from a great preparation.
Maureen: Alright.
Mauro: Here's what we're gonna do next with this flexible pad.
Just light sanding to remove any loose debris that's on the chair right now.
Maureen: Okay, so not sandpaper.
Mauro: Not a sandpaper, but it's a scrub pad.
It's really good.
It's flexible.
And we can go around the curves and everything.
Maureen: Okay.
Perfect.
Mauro: Alright?
[ Vacuum whirring ] We're going to vacuum to remove any of the residue that stays there.
Now it's time to wipe off all the surface with denatured alcohol.
Maureen: So, Mauro, why denatured alcohol?
Mauro: Because it dries fastest and cleans better.
Maureen: Alright.
Mauro: Look at this, Maureen.
Maureen: Oh, my goodness.
Mauro: Okay, Maureen, look.
Nice and clean.
Now it's time to spot-prime all the rust spots that we can have, alright?
Maureen: Okay, only the rust-rust?
Mauro: Yeah, we're not going to prime the whole thing with this primer.
Maureen: Okay.
Mauro: We take care of all the areas that we sand with a lot of rust.
Maureen: Okay.
Mauro: That's the areas.
But first, you gotta do a very good shake on that bottle.
Maureen: Mine's not making the same sound as yours.
Mauro: No, go strong... [ Cans clacking ] ...like you're doing a -- like you're mixing a good martini.
Maureen: Ah, okay.
Mauro: Alright?
Just like that.
Alright.
And you go like this.
Just for the rust spots, just like that.
On there.
On here.
The primer that we used for the rust areas is completely dry.
Now we're going to use a different primer for the rest of the chairs, which is good for everything except for the rusty areas.
So that's done.
Now let's use this primer.
Maureen: But what if I hit this primer on top of the rusty primer?
Mauro: If you hit just a little bit, it's totally fine.
Maureen: Okay.
Mauro: Just don't go over.
Alright?
Maureen: Okay.
Mauro: You're going to -- You're going to be about a foot away.
Maureen: Okay.
Mauro: We're going to let it dry for about 30 minutes, and then we can start applying the first coat of paint.
Maureen: Alright.
It looks like everything's dry.
What's next, Mauro?
Mauro: Okay, we're ready to apply the first of two coats.
And this is called DTM.
Maureen: DTM.
What does that stand for?
Mauro: DTM stands for direct to metal.
This is a specific paint for metal surface.
Alright?
Maureen: Okay.
Excellent.
I can't help but notice the paint looks like it's not black.
Mauro: Looks like a little green?
Maureen: It does look a little green.
Mauro: DTM paint looks like green.
Once you apply it, you turn black.
Maureen: Oh.
Alright.
I will trust you and science, Mauro.
Mauro: Okay.
I will do the roller first, because I want to see this color right away.
And we're also using a 3/8 roller nap.
For metal, I like to use a short nap.
Maureen: Okay.
Mauro: Which will give us a nice and smooth finish.
See?
That's the roller.
It's the roller cover.
And this is the 3/8 of an inch.
You see here?
Maureen: Okay, I understand.
Mauro: Alright.
Which is very thin.
Maureen: And that works better on metal?
Mauro: That works better in metal or very nice flat surface.
Now I'm going to use the brush for some hard areas from the roller to reach out.
Okay?
Just like that.
We cannot get down with the roller, but the brush works really well here.
♪♪ Let's start prepping the table the same way we did with the chairs.
♪♪ ♪♪ ♪♪ ♪♪ ♪♪ Wow.
Maureen: Wow.
Mauro, this looks fantastic.
Mauro: Looks beautiful.
Seeing the before and after, it looks amazing.
The chairs, the table, everything looks so good.
Maureen: Oh, my goodness.
I hope we can get another 15 years out of it.
Mauro: You can.
So a suggestion for you, get some waterproofing covers for the table and chairs.
And if you have space where you can store it during the winter, this paint job is going to last a long time.
Maureen: Alright.
Thank you so much.
Mauro: You had an old table.
Now you got a new table.
Maureen: Yes.
We couldn't have done it without you.
Mauro: It was very good to meet you and do the work with you.
Enjoy it.
Maureen: Have a great day.
Mauro: Thank you.
♪♪ ♪♪ Kevin: Next time on "Ask This Old House," Lee gives a driveway a coastal makeover.
Lee: So, over time, this is going to bleach out in the sun.
Homeowner: Beautiful.
Kevin: Then we challenge our crew with a game of what is it?
And are you concerned with radon levels in your home?
Ross helps a homeowner test and mitigate the problem.
All that on "Ask This Old House."


- Home and How To

Hit the road in a classic car for a tour through Great Britain with two antiques experts.


Support for PBS provided by:
Funding for Ask THIS OLD HOUSE is provided by The Home Depot and Renewal By Andersen.